 Printer Friendly Version Printer Friendly Version
GLUTE-HAM POWER
The glute-ham raise is a top-priority BFS auxiliary exercise because it is the superior way to develop the glute and hamstring muscles. Unlike leg curls, this exercise thoroughly works the hamstrings.
By Bob Rowbothham
Published: Winter 2002
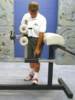
The glute-ham raise strengthens the hamstrings from origin to insertion, and also exercises the glutes as they coordinate their movement with the hamstrings (See Photo One). High school and college strength coaches should note this exercise is so important that we recommend it be performed twice a week with two to three sets of ten repetitions.
Before you begin to perform the glute-ham raise on the glute-ham developer machine, you should become familiar with the three adjustments. The first adjustment to learn is moving the foot/ankle pad up and down. Simply pull the Pop Pin and adjust the height of the foot/ankle pad as shown in Photo Two. The lower the adjustment, the easier it is to do the glute-ham raise. The higher the foot/ankle pad, the harder it is to complete the movement.
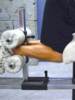
The second adjustment is moving the foot/ankle mechanism forward and back. Again, simply pull the Pop Pin and adjust the foot/ankle mechanism as shown in Photo Three. The greater the gap between the foot/ankle mechanism and the big pad in front, the easier it is to do the glute-ham raise. The narrower the gap, the harder it is to do the raise.
The third adjustment is the footplate (see Photo Four). It is important to get your feet in tight in order to make sure the entire foot is flat against the back plate. If it is loose, the heel will have a tendency to come away from the plate. This will interfere with the athlete's ability to execute perfect technique. The Pop Pin makes for an easy adjustment of the footplate.
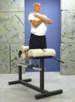
Getting Started: Every athlete should start with the very easiest settings-even the elite athlete. Photo Five shows this beginning setting. The foot/ankle pad should be at the lowest setting and the foot/ankle mechanism should be adjusted to a point where the knees are back of the front pad as shown. The easiest way to perform the glute-ham raise is to cross your arms on your chest as shown in Photo Six. Now you should be ready to try to do two sets of ten repetitions.
Technique Guidelines: The technique sequence of using the crossed-arms position is shown in Photo Seven. As you come up, you must spread the chest. Do not round your back. Secondly, you must try to keep your knees level. Do not let your knees drop below your starting point. Third, keep your eyes on a target straight ahead. You must not let your chin drop towards your chest.
Some athletes will not be able to do two sets of ten repetitions. In this case, do what you can for two sets and write down in your Log Book or on your Record Card what you were able to do. For example, on the first set you did seven reps and on the second set you did six reps. On the next workout simply try to do more and break your personal record. Some athletes might not be able to do any reps. In this case, a coach or teammate can assist the athlete through the sticking point.
All athletes should record their efforts in the Auxiliary Section of their BFS Log Book, on a Record Card or their Beat the Computer System. Record the exact adjustment level (hole number) you used with the foot/ankle pad and the foot/ankle mechanism. If you do not use our BFS materials, you should record this information using your own system.
How to Progress: I cannot stress enough the importance of progressing slowly and following my progression guidelines. There is a danger if you suddenly make radical adjustments to the foot/ankle pad or the foot/ankle mechanism. If you are successful in doing two sets of ten as described for the first workout, you may try to advance by interlocking your fingers and placing your hands behind your neck as shown in Photo Eight Now try to do two sets of ten in this manner using the exact same settings as in the first workout. It will be a little tougher. Remember to record your efforts. If you were completely successful, you may advance to the next progression.
The third progression step is to move the foot/ankle pad up one notch. Use the arms-crossed-on-chest position. The fourth progression is to use the hands-behind-the-neck position. Your next progression will involve adjusting the foot/ankle pad up another notch. Alternate your arm/hand position as previously described.
After you have mastered the glute-ham raise from a two-notch increase of the foot/ankle pad, you are ready to move the foot/ankle mechanism one notch closer to the front pad. However, you must lower the foot/ankle pad back to the beginning position. To progress from this point, repeat the sequence of raising the foot/ankle pad and the hand/arm positions as previously done.
After you have mastered another two-notch raise of the foot/ankle pad, you are ready to bring the foot/ankle mechanism in another notch (see Photo Nine). Go through the exact same sequential progression until you are ready to make the final adjustment to the foot/ankle mechanism (see Photo Ten). When that level of difficulty is mastered, then you should go back to the foot/ankle pad and move it up to the third notch but move the foot/ankle mechanism back only one notch.
Your final progression would be to adjust the foot/ankle pad to its highest position and the foot/ankle mechanism to its closest position and perform three sets of 25 reps (See Photo Eleven). Wow! That would take a superior athlete.
|

|
Photo One
|

|
Photo Two
|
|
Photo Three
|

|
Photo Four
|

|
Photo Five
|
|
Photo Six
|

|
Photo Seven
|

|
Photo Eight
|
|
Photo Nine
|

|
Photo Ten
|

|
Photo Eleven
|
|
