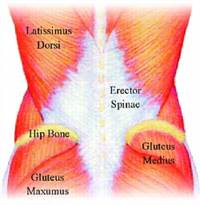
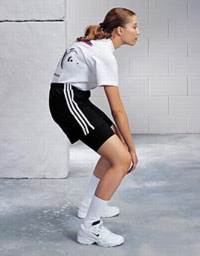
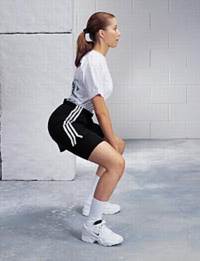
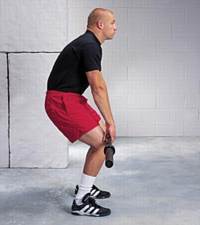
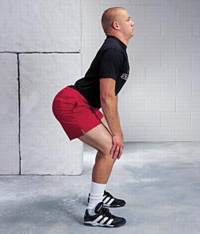
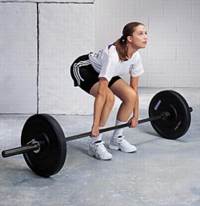
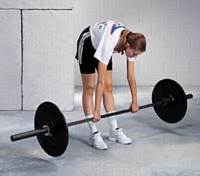
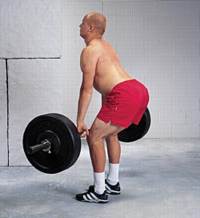
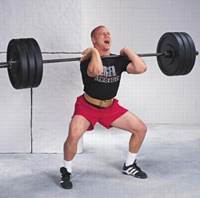
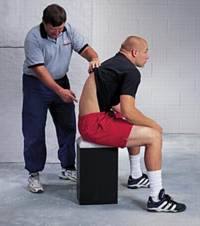
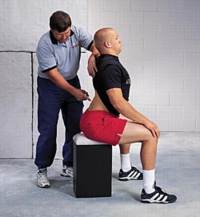
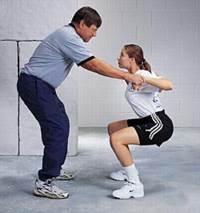
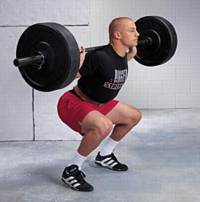
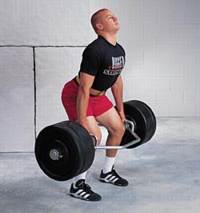
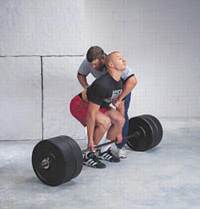
Lower Back SafetyA Quick Overview of Lower Back SafetyBy Bigger Faster Stronger Published: Injury prevention of the lower back depends on two factors. First, every athlete must know how to get into a safe, strong lower back position - not only in the weight room - but in the athletic competition as well. Never twist to get an extra rep. Never sacrifice technique for a few extra pounds. The second factor is strengthening the lower back and abdominal area. Identifying Problems Image 1 - Dangerous Athletic Position: This athletic position is sometimes called an “ready” or “hit” position. The illustration shows a weak and dangerous posture. The lower back is curved out like a banana. Many times an athlete will bring his hips forward as he/she tries to correct this dangerous position. However, this only makes the position worse. Image 2 - Correct Athletic Position: Notice the difference in the lower back. This lower back has a swooped-in concave position. The hips are back in a strong, powerful position. Athletes involved in sports like football, basketball, volleyball, track, hockey, wrestling, tennis, etc. must be able to get into this correct athletic position for maximum safety and strength. Image 3 - Dangerous Clean Position: This photo shows the lifter in a bad Power Clean position. Notice the rounded shoulders and lower back which again looks like a banana. This is not only a dangerous position but is also weak and ineffective. Image 4 - Correct Clean Position: An easy way for many athletes to get into a correct athletic position is to place “hands on knees”. The athlete is now in a solid, safe and strong Athletic or Clean position. The shoulders are upright and back. The lower back is swooped-in and the hips are well back. Lower Back Safety & The Clean Image 5 - Correct Bottom Position: This lifter has her head up and hips down which is correct. The lower back should always be in a concave position. Always remember the lower back can be fixed by spreading the chest. The photo demonstrates the correct way to pick up a weight when doing an exercise like a clean and the correct position in setting a weight down. Image 6 - Dangerous Bottom Position: This is not the way to set a weight down: The head is down, the hips are up and the lower back is rounded like a banana. The correct way is to keep the head up with the hips down and spread the chest. The correct bottom position should look the same whether picking up a weight or setting it down. Image 7 - Correct Clean Position: The athlete is in a perfect Power Clean position. His head and shoulders are upright. The hips are back and the lower back is in a tight swooped-in concave position. His position is strong, powerful and safe. Image 8 - Correct Rack Position: The rack or finish position on the Power Clean should be like the athletic position. The hips should be back not forward. The lower back should be in a concave position with the body in an upright position. The key to keeping the hips back is forcing the elbows upward and forward. Correction Procedures Image 9 - Dangerous Lower Back: If an athlete cannot correct himself, he then must sit on a box or bench. Notice his rounded back. The shoulders are forward and the lower back is not in a concave position. Lifting up the athlete’s shirt just makes it easier to see potential problems. Image 10 - Correct Lower Back: Say the magic words: “Be Tall” and “Spread the Chest”. Now the shoulders are upright and back with the lower back in a concave position. If there are still problems, the coach can “mold” the athlete into the correct position by pressing in on their lower back and pulling back on the shoulders. Image 11 - Low Power Position: To achieve a solid, safe lower back position in the Parallel Squat learn how to get into a perfect “low power position”. A partner can be used for balance as shown. Squat down to a parallel position and “be tall” and “spread the chest”. Concentrate on locking-in the lower back. Image 12 - Correct Squat Position: This athlete is in a great Parallel Squat position. The chest is spread as wide as possible. This is the key to keeping the lower back locked in tight. He is also sqautting tall. This keeps the back and shoulders from rounding. This athlete is in a strong and safe position. Image 13 - Correct Hex Bar Position: The athlete is in a powerful and safe position as he demonstrates the Hex Bar Dead Lift. The head is up. The shoulders are back. The chest is spread and the hips are down. Always concentrate on locking-in the lower back when picking up a weight. Image 14 - Dead Lifting Safely: The spotter places one hand on the small of the back and hooks the crook of his elbow in front of the lifter’s shoulder. The spotter also places his fist on the lifter’s sternum and pulls the lifter back on his heels to begin the lift. Never lift a heavy weight when the pressure of the weight is on the toes. It is much safer when the pressure is on the heels. |
 |
|
The Lower Back |
 |
|
The Lower Back |
 |
|
Image 1 |
 |
|
Image 2 |
 |
|
Image 3 |
 |
|
Image 4 |
 |
|
Image 5 |
 |
|
Image 6 |
 |
|
Image 7 |
 |
|
Image 8 |
 |
|
Image 9 |
 |
|
Image 10 |
 |
|
Image 11 |
 |
|
Image 12 |
 |
|
Image 13 |
 |
|
Image 14 |